
Showing posts with label Tips and Tricks. Show all posts
From Pirate Darling To Dropbox Alternative: BitTorrent Sync Lets You Keep Your Files Synchronized Across Machines
The days of having to shuttle files between machines on USB sticks seem like a distant memory from a simpler time. Today, it’s all about the cloud. Want to access your files from more than one machine? Nothing could be simpler: Just stick them in Dropbox (and hope there isn’t anotherauthentication bug), or Drive (courtesy of our corporate overlords at Google), or SkyDrive(developed by the benevolent behemoth that is Microsoft). To put it differently, cloud-based file sync services are easy to use and work well, but your privacy may or may not be their first priority. Not to mention the fact that these services always come with a storage quota. You can try to maximize the free storage space, but a quota is a quota. If you’re longing for an alternative, you should check out BitTorrent Sync.
This new service from BitTorrent harnesses the power of the distributed file-sharing network to keep your own private files in sync. It’s not like torrenting your files, though: BitTorrent Sync works with secret keys that let you selectively choose what to share with whom, and even supports expiring, temporary keys. Let’s walk through installing the service and sharing a folder.
Installation: Next. Next, Done!
Installation couldn’t be simpler. It’s not even a next-next-next affair, really, as it only has two steps. Two things are worth noting: BitTorrent Sync is utterly clean of any ads or any other dubious content (and it does not come with a BitTorrent client), and the only sort of special treatment it asks for is making a hole in the Windows firewall:

Initial Configuration
Once installed, run BitTorrent sync to begin the configuration process:

We’ll get to secrets in a moment. For now, pick Standard Setup (the default), and click Next. BitTorrent Sync will then ask you for a folder to sync:

It’s worth noting that you can use BitTorrent Sync to synchronize any folder, not just its own special folder.
Once you pick a folder, BitTorrent Sync will produce a secret for it:

This is a long string of characters which you can then use to connect to this folder from any other device. This is a key difference between BitTorrent Sync and other file-sync solutions: There are no user accounts, and you won’t be asked to create a password for yourself at any point in the process. Rather, each folder has one or more secrets, and that’s what you use to connect to it.
The Tour
Once you pick your first folder to sync and get a password, BitTorrent Sync will show a quick three-step tour:

The first step of the tour shows the control panel, while the next explains you can sync an unlimited number of folders, and files of any size. Finally, BitTorrent Sync shows how you can quickly copy the secret for any shared folder, to share it with family or friends:

Once you finish the tour, you’ll find yourself in the BitTorrent Sync interface proper.
Adding Folders For Sharing
One of BitTorrent Sync’s cool features is that you can add new folders from anywhere on your computer. The Shared Folders tab has an Add button which you can click for this dialog:

Once you add a folder that already contains files, BitTorrent Sync will take a few moments to index its contents. You will already be able to copy its secret and share it with other BitTorrent Sync users. Once I entered the secret for this folder on another computer running BitTorrent Sync, the other computer’s name showed up in the BitTorrent Sync window, and files started going through instantly (they were on the same LAN, but this should work over the Internet as well, assuming you’ve let the installer configure your Windows firewall).
Your Secret: It Really Is a Secret
One thing really bears another mention here: When BitTorrent Sync gives you a secret, it means it. It is a secret. Anyone who possesses this magic string of letters will be able to gain access to the folder you’ve shared, no questions asked. Yes, you will see an unexpected device name in the Devices tab, but that will be too late: By then, the hostile party may already be in possession of your files.
Advanced Secret Tactics
What if you want to allow access to a folder, but not risk anyone deleting or modifying its contents? And what if you only want to share a folder for a limited time? BitTorrent Sync has you covered: Double-click the folder, switch to the Advanced tab, and you’ll get the following:

Here you can see the folder’s existing secret, its read-only secret (for allowing permanent read-only access), and generate one-time secrets. A one-time secret can only be used once, and expires after 24 hours. That’s pretty awesome.
A Very Promising Start
BitTorrent Sync gets a lot of the basics right. Setup is a snap; you can share any folder; you don’t have to create user accounts; and the underlying file-transfer technology is, shall we say, extensively field-tested and proven. Whether or not it catches on as a mainstream means of synchronizing files — only time will tell. But this initial test shows that there’s a lot going for it.
Now Send Video Messages using Skype in Windows 7 and 8; New Feature Added

Well! no body can be always online, when you make Video calls. At the time you can leave a message. But the Skype for Windows doesn’t has this video message feature until now, you can only leave a text message in Skype.
But now Skype released the new feature “Skype Video Messaging” in its latest beta release of Skype for Windows 7. This new Video messaging feature will be available soon for Windows 8 users soon. By using this feature Windows 7 users can leave a video message to their friends when they are not available to your call or offline.
Microsoft announced that this feature is also in preview for users of Skype for Mac, Skype for iPhone, Skype for iPad and Skype for Android. Skype for Windows 8 and Windows Phone users can also receive and view Video Messages. But they can’t record Video message as of now. Windows 8 and Windows 8 phones user have to wait for further update t record video messages. And the Good news is, the update is coming soon for these platforms.
This video Message for Skype feature is currently beta stage, and Microsoft has improved and fixed many bugs. issues fixed in this release of Skype 6.5 beta for Windows desktop,
| Category | Description |
| Calling | Ability to call is disabled in some situations when trying to call a number |
| Calling | Stability of the application when placing outgoing calls & no camera present in system |
If you want to try yourself this Skype Video Messaging, then you have to download Skype 6.5 beta for Windows desktop.
Last week Outlook.com have got the Skype Video calling feature. If you are the Outlook.com user, you can try this new video calling right from your mail account.
Tag :
Tips and Tricks
Open MS Word, Powerpoint, Excel in Browser Using Chrome Office Viewer by Google

You don’t have to spend money for purchasing MS Office anymore, to view MS Word, PowerPoint and Excel in your office. Google has just released the Chrome Office Viewer, which is the new Chrome Extension for Chrome OS and Chrome Browser.
Chrome Office Viewer extension is like Google’s built-in Pdf Viewer. It gives you the ability to view and read the Microsoft Office files (Word, PowerPoint,Excel) directly from the browser itself. It is the convenient way to open the word files when you receive the office documents in email. By introducing this new feature in Chrome, things more complicated for rival browsers.
Google chrome has already achieved the huge market share so fast compare to the older browsers like IE and Firefox. According to latest report by StatCounter, Chrome has 37% worldwide usage share of web browsers and makes it the World’s popular and most used browser.

Also Read : Best Five free Alternatives for MS Office Application (Don’t spend You Hard Earned Money)
Chrome Office Viewer is compatible with Windows, Mac. But I couldn’t install this browser in my Windows 8 system which has latest stable release of Google chrome 26. Google Web store blocks the installation and shows the error message “This application is not supported on this computer. Installation has been disabled.” This extension is currently in beta stage, and you need to chrome beta 27 or developer build to install this extension in your system.
So you have to wait for the full stable version of Chrome Office viewer to open the Microsoft Word, Excel, and PowerPoint files in your browser with a single click. This extension also works in offline, so you don’t always on internet connection to open Office files in the browser.
Be sure to check out the One Tab that will reduce tab clutter and the memory usage chrome and StylishGoogle Now New Tab Page
Tag :
Tips and Tricks
Free Apps You Should Try
1. Google Chrome
A blisteringly fast, lightweight Internet Browser.

2. 7-Zip
Lightweight, fast and opens more file types than you can shake a stick at. A bit ugly though. More details about 7zip. Split large files for emailing with 7zip. Put split files back together with 7zip.

3. CCleaner + CCEnhancer
PC slowing down? Try CCleaner, it cleans your PC of unneeded temporary files and folders, cleans the registry & much more! Add CCEnhancer to the mix and you’ve got yourself a full system cleaner. More details about CCleaner.

4. Gyazo
It doesn’t get any faster than this image capturing & sharing tool. Click, Snip & Share!

5. Microsoft Security Essentials
In my opinion, the best anti-virus product on the market. Light, fast, good looking, frequent updates & great detection rates, all make ‘MSE’ a well-rounded product. The complete guide to protecting your Windows XP, Vista, or 7 PC with Microsoft Security Essentials.
Note: This is no longer required in Windows 8; Windows Defender is back in the spotlight and bundled with the OS.

6. Virtual Clone Drive
Like to keep backups of DVD’s? DVD drive broken? Then install Virtual Clone Drive. It emulates a DVD drive so you can mount files and use them as you would a physical one.

7. µTorrent
“Speedy, efficient, and free. µTorrent is the world’s most popular BitTorrent client for a reason.” Enough said.

8. DropBox
Sync anything across multiple computers.

9. Team Viewer
Friends and family treat you as a free PC technician? Me too, use this to help them when you’re not at their desk. How to help your friend with their PC problems using remote access via team viewer.

10. Rainmeter
Customise your Desktop to your hearts content as the possibilities are endless. Touted as a system monitor, which frankly undermines its capabilities. See what Stu created using this app.

11. Seven Drive Changer
Made by our very own Windows Forums member Batu. Changes the icons of the drives in the ‘Computer’ view of Windows Explorer. A somewhat challenging task if done manually. A breeze with this.

12. 7CONIFIER
Like customising your Taskbar and Start Menu icons? With this app changing them all at the same time, and to a custom (or pre-made) theme pack is a cinch.

13. Keepass
Keep your internet browsing sessions safe by using strong passwords. Keepass generates mid-bogglingly complicated password in a millisecond and stores them all, so you never have to remember another password again.

14. Easy BCD
Managing your Boot Manager has never been so easy.

15. HiddenFiles Toggle
Tires of having to toggle the ‘hidden files and folders’ option in the view tab of the folder options window? Install this to have a toggle option in your context menu. Not x64 compatible.

16. Windows Live Essentials 2011
Email client, blogging client, photo gallery, movie maker & much more. Looks and functions amazingly and yes, it’s also free. You don’t seriously think Microsoft would ever charge for the privilege? Do you?

17. Library Icon Changer
Customise the icons to the Library’s in Windows 7. A lengthy procedure when done manually. Easily 7 quickly accomplished with this.

18. Shark 007 Codec Pack.
Got some media files that won’t play on your Windows system? Install this fantastic comprehensive codec pack.

19. FileZilla
A FTP client that’s fast, light and works great. Rich made some recommendations recently. Check them out.

20. Revo Uninstaller
This is a great program for uninstalling other programs for you system. Cleans up traces of uninstalled programs better than the built-in installers ever could. x64 users have to pay. More details about Revo.

21. Handbrake
HandBrake is an open-source, GPL-licensed, multiplatform, multithreaded video transcoder. Great for converting those DVD’s. More details about Handbrake.

22. MediaBrowser
Take your Windows 7 Media Centre experience to another level with Media Browser. A frequently updated plug-in that makes Media Centre cool.

23. ImgBurn
They say “ImgBurn is a lightweight CD / DVD / HD DVD / Blu-ray burning application that everyone should have in their toolkit!” I agree. More details about ImgBurn.

24. Media Monkey
Sick of Apple and their shoddy iTunes software but have an iPod? Use Media Monkey to relieve the shackles. Also great looking and easily manages massive music collections.

25. Wubi
Ever wanted to install another Operating System or just curious as to what Ubuntu is? Installing it has never been simpler. This runs and essentials acts as just another programs in your system. no dual booting required, just install it, reboot and choose Ubuntu!

Tag :
Tips and Tricks
How to reduce the number of Dump Files created by Windows
Whenever your Windows System crashes, it creates one file called a Dump File. These mini dump files are memory images of that point in time, when your Windows computer had crashed.
This dump file type includes the following information:
- The Stop message and its parameters and other data
- A list of loaded drivers
- The processor context (PRCB) for the processor that stopped
- The process information and kernel context (EPROCESS) for the process that stopped
- The process information and kernel context (ETHREAD) for the thread that stopped
- The Kernel-mode call stack for the thread that stopped.
Windows 7, by default creates and stores 50 mini dump files. These mini dump files are located in the%SystemRoot%\Minidump directory.
If you are a geek who needs to use these dump files to troubleshoot your computer crashes, then having the last 50 dump files may be of use to you!
If not, they will simply end up eating disk space.
You can if you wish, reduce the number of dump files which your Windows creates.

To do so Follow the below steps:
1.open regedit and navigate to the following key:
2.HKEY_LOCAL_MACHINE\SYSTEM\CurrentControlSet\Control\CrashControl
3.Double click MiniDumpsCount and change its value data.
4.The default in Windows 7 is 32 Hexadecimal or 50 Decimal. Reduce its Decimal value to 10, if you only want the last 10 mini dump files to be saved.
Tag :
Tips and Tricks
Increase Internet Speed using Google DNS and OpenDNS
If You use Google’s public DNS server or OpenDNS server, you may notice little bit extra speed on your Broadband Internet connection or dial-up internet connection. The web pages will load quickly and YouTube Videos will load much faster that before.
If you are using your ISP’s DNS server as default, now it is the time to change it to Google’s Public DNS or OpenDNS.
Why should I use Google DNS or OpenDNS?
Google DNS server and Open DNS server are working with the content Delivery Networks (CDNs).When you request the webpage those DNS servers will attach your location data also in the DNS requests, so that you will be connected to nearest possible server-based on your location.
To use Google’s Public DNS service or OpenDNS, you’ll need to configure your router or computer to use their DNS servers addresses.
How to set up or Configure Google Public DNS server?
The Google Public DNS IP addresses (IPv4) are as follows:
- 8.8.8.8
- 8.8.4.4
The Google Public DNS IPv6 addresses are as follows:
- 2001:4860:4860::8888
- 2001:4860:4860::8844
You can use either number as your primary or secondary DNS server. You can specify both numbers, but do not specify one number as both primary and secondary.
You can configure Google Public DNS addresses for either IPv4 or IPv6 connections, or both.
For More details go to official Google Public DNS page
How to set up or Configure Google Public DNS server?
With OpenDNS, you’ll also get additional services like malware detection, stats, and more, in addition to the speed boost.
To configure OpenDNS use this link
Tag :
Tips and Tricks
Password Protection to USB without using Software
Today I'm gonna talk about USB Drives.
I'll show you a simple trick to lock your USB drive without using any 3rd party software.
Most of the people doesn't like other people checking their personal files and folder on USB, including me. This insecure situation creates a huge space to theft our personal data by someone. If you use password protection to your USB, you can reduce the data theft.
Lots of USB password protect software available in present market, but you want to pay money to use it for lifetime. If you're using Windows you don't need any software.
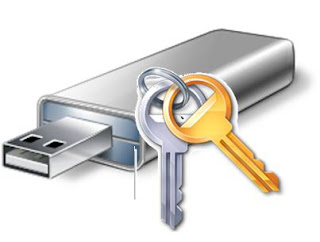 So let's see how to set a password protect on your USB without using any software.
Insert your USB drive to computer
Click on Start
In "Search programs and files" box, type Bitlocker Drive Encryption
Now launch that application.

Then look for your USB drive and click on Turn on Bitlocker
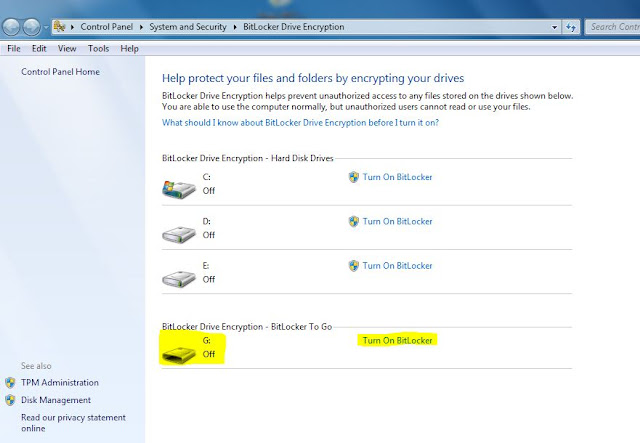
Windows will ask you to set a password.
Now set a strong password.
I'll show you a simple trick to lock your USB drive without using any 3rd party software.
Most of the people doesn't like other people checking their personal files and folder on USB, including me. This insecure situation creates a huge space to theft our personal data by someone. If you use password protection to your USB, you can reduce the data theft.
Lots of USB password protect software available in present market, but you want to pay money to use it for lifetime. If you're using Windows you don't need any software.

Insert your USB drive to computer
Click on Start
In "Search programs and files" box, type Bitlocker Drive Encryption
Now launch that application.
Then look for your USB drive and click on Turn on Bitlocker

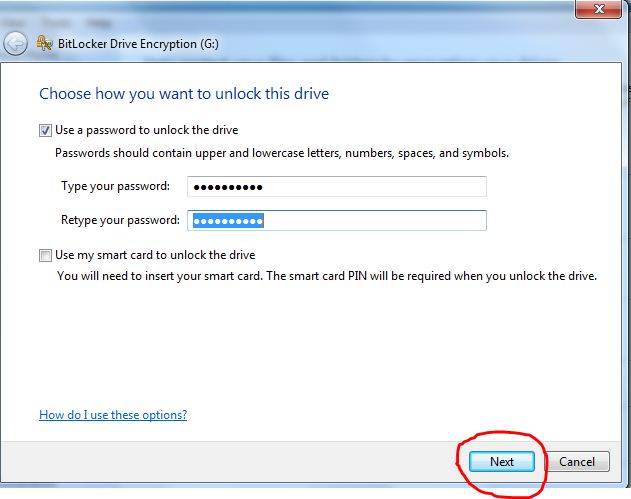
Windows will ask you to set a password.
Now set a strong password.
Click on Next
If you want save the password in a safe place.
And click on Next
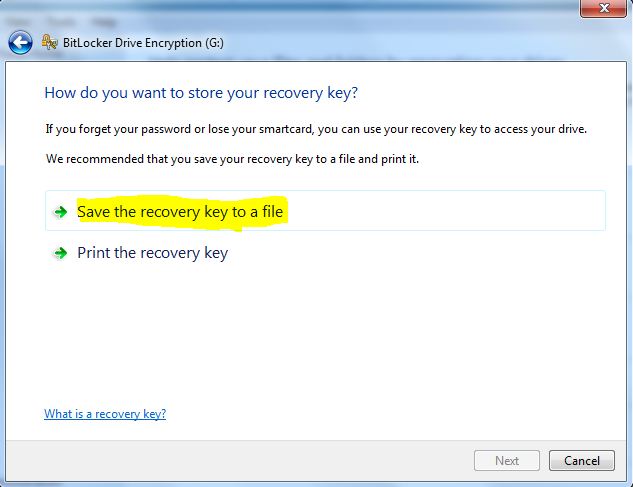
Now click on Star Encrypting
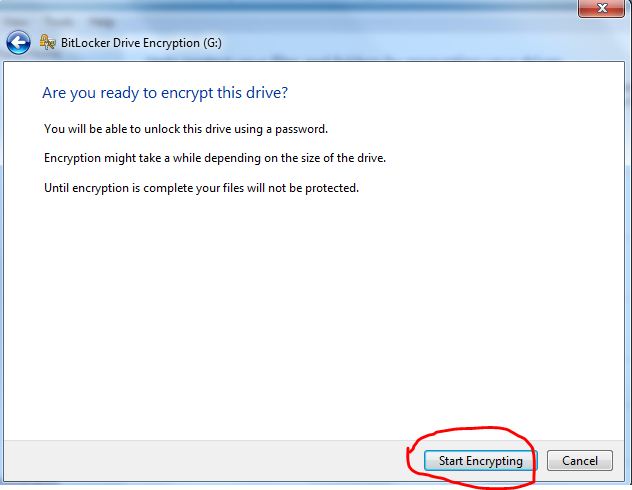
That's all !!! :)
From right now if someone tries to access your USB, Windows will ask him/her to enter the current password.
Note : This trick will works only in Windows

If you want save the password in a safe place.
And click on Next

Now click on Star Encrypting

That's all !!! :)
From right now if someone tries to access your USB, Windows will ask him/her to enter the current password.
Note : This trick will works only in Windows
Tag :
Tips and Tricks
How To Add Contact Form To Blogger
In This Tutorial, You Will Learn How To Contact Form To Blogger. Contact Form Is Necessary For Every Blog. Contact Form Is Used In Many Ways. Example For Feedback, Visitor Query, Guest Posts, Your Service And Many More.
Method To Add Contact Form To Blogger.
- Go To EmailMeForm And Sign Up.
- Now Login And Click Add Form Button On Right.
- Now You Can Choose Pre-Made Forms Or Create Your Own.
- If You Select Pre-Made Forms, Select Your Form And Click Customize.
- Change Form Title, Select Redirect URL And Enter URL Where You Want To Redirect When Submission Complete.
- You Can Also Change Styling Options, Also Enable And Disable Captcha Verification For Scam.
- When Editing Is Done Click Save Form Button And Select Take Me Back To The Form Manager.
- Now Under Form Title Click Code And Select All Code Of Any Type(HTML With Javascript/CSS, Easy Embed, HTML Link, HTML Only And Other Platforms.
- Login To Blogger Account.
- Click Blog Title → Pages → New Page → Blank Page.
- Enter Page Title "Contact Us" Or "Contact Me" Or "Contact".
- Paste Code You Copied In Page Body Box And Click Publish Button.
- You Are Done.
Tag :
Tips and Tricks
How To Add Floating Twitter Fan Box In Blogger
In This Tutorial, You Will Learn How To Add Floating Twitter Fan Box In Blogger. This Twitter Fan Box Is Similar To Facebook Like Box And Google Friend Connect. This Will Helps You To Connect With Your Readers Easily.
- This Twitter Fan Box Show Recent 10 Followers By Default And Your Readers Can Follow You Without Leaving Your Blog. This Fan Box Is Created By Mark Carey.
- Login To Blogger Account.
- Click Blog Title → Template → Edit HTML.
- Click Proceed Button.
- Search Following Code Using Ctrl+F.
Replace The Above Code With The Code Below.
- Replace Taqi_Shah With Your Twitter Username.
- Click Save Template Button And You Are Done.

Tag :
Tips and Tricks
How To Block A Website In Google Chrome (Windows 7)
oday You Will Learn How To Block A Website In Google Chrome. Now Days People Mostly Using Google Chrome And Firefox. With This Method You No Need To Install Software To Block Websites. You Can Block Any Website With This Method, But This Is Useful When You Want To Block Harmful Websites.
- Right Click On Notepad And Run As Administator.
- When Notepad Open Press Ctrl+O To Open A File.
- Then In File Name Type C:\Windows\System32\Drivers\Etc\Hosts To Open Hosts File.
- After Opening File Go To Last Line And Type 127.0.0.1 Press TAB Key Then Website Name (Example: Www.Example.Com).
- Now When You Try To Open Website In Google Chrome(Or Any Other Browser) Will Not Open.
Tag :
Tips and Tricks
Block Any WebSite Without Using Any Software

Most of People use different Software's for blocking website which also takes part to decrease your Computer Speed. I recommend that do not install so much Software's in your computer because it will increase your running applications and also decrease your space in your hard derive...
There are many Software's in Market which are used to block some sites but I am sharing a trick here. Use this trick to block your webs sites. Just Follow these steps..
1. Goto Start and Then goto Run
2. Then write there "C:\windows\system32\drivers\etc" without inverted commas you can also go there by opening My Computer then C drive> windows> system32> drivers> etc
3. In this folder you can see a file with name "Host"
4. Open Notepad and drop this file in it or open this file in Notepad
5. Go down in this file you will see "127.0.0.1" local host or you may find this by pressing ctrl+f
6. Now do the final step just add the web site you want to block blow the 127.0.0.1
Enjoy this trick......!
Tag :
Tips and Tricks
SEND A FREE SMS...!
SEND A FREE SMS...!
You can now easily send SMS to any network it totally free,just fill these following things and in Message box send your Private Message.
Tag :
Tips and Tricks
How To Block Social Sites
Yes, it is true now you can Block facebook on your computer, i saw in many companys facebook or other social community sites are block you can enable and disable by using following method. The location ...
Yes, it is true now you can Block facebook on your computer,
i saw in many companys facebook or other social community sites are block you can enable and disable by using following method.
The location of the hosts file depends on your operation system.
Windows XP, Vista and Windows 7 C:\WINDOWS\system32\drivers\etc\hosts
Note! Make a backup of the hosts file and put it somewhere safe, in case you mess up.
1. Open the hosts file using Notepad or other plain text editor.
2. Copy the following:
# block facebook
127.0.0.1 login.facebook.com
127.0.0.1 www.facebook.com
127.0.0.1 blog.facebook.com
127.0.0.1 apps.facebook.com
3. Paste it into the Hosts file after 127.0.0.1 localhost
4. Save and close the Hosts file.
5. Reboot your computer to apply the changes.
6. Try to open Facebook in a browser.
i saw in many companys facebook or other social community sites are block you can enable and disable by using following method.
The location of the hosts file depends on your operation system.
Windows XP, Vista and Windows 7 C:\WINDOWS\system32\drivers\etc\hosts
Note! Make a backup of the hosts file and put it somewhere safe, in case you mess up.
1. Open the hosts file using Notepad or other plain text editor.
2. Copy the following:
# block facebook
127.0.0.1 login.facebook.com
127.0.0.1 www.facebook.com
127.0.0.1 blog.facebook.com
127.0.0.1 apps.facebook.com
3. Paste it into the Hosts file after 127.0.0.1 localhost
4. Save and close the Hosts file.
5. Reboot your computer to apply the changes.
6. Try to open Facebook in a browser.
Tag :
Tips and Tricks
Use pendrive as RAM to increase computer speed
TRICK TO SPEED UP YOUR COMPUTER USING PEN DRIVE
Yes it is true now you can use pen drive as RAM to speed up your computer and work more faster.
If your Computer works slow when you are using multitasking,browsing pictures or playing multimedia files, This is because of you don't have enough memory to store cache files. With the use of this simple trick you can speed up your computer with your USB Pen drive.
Windows Ready Boost can use storage space on some removable media devices, such as USB flash drives, to speed up your computer. When you insert a device with this capability, the Auto Play dialog will offer you the option to speed up your system using Windows Ready Boost. If you select this option, you can then choose how much memory to use for this purpose. However, there are some situations where you may not be able to use all of the memory on your storage device to speed up your computer.
Some universal serial bus (USB) storage devices contain both slow and fast flash memory, and Windows can only use fast flash memory to speed up your computer. So if your device contains both slow and fast memory, keep in mind that you can only use the fast memory portion for this purpose.
 |
The recommended amount of memory to use for Windows Ready Boost acceleration is one to three times the amount of random access memory (RAM) installed in your computer. For instance, if your computer has 512 megabytes (MB) of RAM and you plug in a 4 gigabyte (GB) USB flash drive, setting aside from 512 MB to 1.5 GB of that drive will offer the best performance boost. The minimum size for any USB flash drive to work with Windows Ready Boost is 256 MB.
Step by step guide to INCREASE YOUR COMPUTER SPEED USING PEN DRIVE
Step 1 : Plug a flash drive or other removable media device into your computer.
 |
 |
Step 4 : Click apply, OK to proceed.
How to Stop Ready Boost.
Step 1 : Open My Computer and Right Click the the Properties dialog box for your flash drive or other removable media device.
Step 2 : Click the "Ready Boost" tab on the right side of the window. Select "Do not Use this device"
That's all...
don't forget to leave comment...
Tag :
Tips and Tricks