
Archive for March 2012

Batching
- Determining If a Database Supports Batching
- Executing a Batch of SQL Statements in a Database
Determining If a Database Supports Batching
With batch updating, a set of SQL statements is assembled and then sent altogether to the database for execution. Batch updating can improve performance.
try {
    DatabaseMetaData dmd = connection.getMetaData();
    if (dmd.supportsBatchUpdates()) {
        // Batching is supported
    } else {
        // Batching is not supported
    }
} catch (SQLException e) {
}
Executing a Batch of SQL Statements in a Database
With batch updating, a set of SQL statements is assembled and then sent altogether to the database for execution. Batch updating can improve performance.
This example creates a batch of insert statements. Auto-commit is disabled so that you have the choice of committing or not in the event of an exception.
try {
    // Disable auto-commit
    connection.setAutoCommit(false);

    // Create a prepared statement
    String sql = "INSERT INTO my_table VALUES(?)";
    PreparedStatement pstmt = connection.prepareStatement(sql);

    // Insert 10 rows of data
    for (int i=0; i<10; i++) {
        pstmt.setString(1, ""+i);
        pstmt.addBatch();
    }

    // Execute the batch
    int [] updateCounts = pstmt.executeBatch();

    // All statements were successfully executed.
    // updateCounts contains one element for each batched statement.
    // updateCounts[i] contains the number of rows affected by that statement.
    processUpdateCounts(updateCounts);

    // Since there were no errors, commit
    connection.commit();
} catch (BatchUpdateException e) {
    // Not all of the statements were successfully executed
    int[] updateCounts = e.getUpdateCounts();

    // Some databases will continue to execute after one fails.
    // If so, updateCounts.length will equal the number of batched statements.
    // If not, updateCounts.length will equal the number of successfully executed statements
    processUpdateCounts(updateCounts);

    // Either commit the successfully executed statements or rollback the entire batch
    connection.rollback();
} catch (SQLException e) {
}

public static void processUpdateCounts(int[] updateCounts) {
    for (int i=0; i= 0) {
            // Successfully executed; the number represents number of affected rows
        } else if (updateCounts[i] == Statement.SUCCESS_NO_INFO) {
            // Successfully executed; number of affected rows not available
        } else if (updateCounts[i] == Statement.EXECUTE_FAILED) {
            // Failed to execute
        }
    }
}
14 Ways to Extend Laptop and Tablet Battery Life

If you use your laptop or tablet on battery power, you’ll know how annoying it is to lose battery power at the “worst time”. While I can’t guarantee your PC will lose power at a more convenient time, I can offer 14 ways to improve your battery life. Learn, in this guide, how to save power when running on batteries.
Note: This guide is written for Windows 7 but most tips apply for Windows Vista
Save Battery Power
Here are some ways to save your battery’s power. You don’t need to apply all these tips but every little helps.
1. Turn Down Screen Brightness
To turn down screen brightness, click the battery icon in the system tray and click Adjust screen brightness.

Slide the brightness slider to the left until you can comfortably see the screen and it’s dimmest setting.

2. Cut Down on Background Applications
Many background applications don’t need to run and only increase CPU cycles and, in turn, the demand on your battery. Here’s a couple of things you can do to cut down on background applications:
2a. Disable Windows Sidebar Gadgets
If you don’t use the sidebar, you probably have it disabled already (right click the Windows Sidebar icon in the system tray and click Exit.)
If you use the Windows Sidebar, do you really need all your gadgets running when you’re on battery power? To disable Windows Sidebar gadgets:
Click the Start button and click Control Panel. Type gadget in the top-right search box, and click View list of running gadgets.
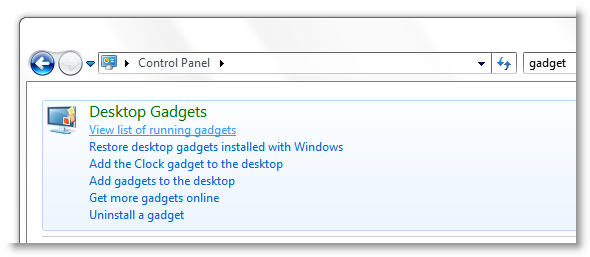
Next to the running gadgets, click remove.

2b. Diable Startup applications
To disable uneccessary startup applications, follow this guide.
3. Disable Your Wireless Internet & Bluetooth
If you’re not using the internet or Bluetooth, consider disabling the hardware to save battery power. To disable your wireless, bluetooth, or both cards, either:
A. Locate the switch on the side of your laptop (many now have this) and turn your wirelesss cards off.
or
B. Click the network icon in the system tray and click Open Network and Sharing Center.

In the left-hand menu, click Change adapter settings.

Right click your wireless connection and click Disable

Repeat for your Bluetooth device.
4. Disable Screensavers
Screensavers use CPU when your PC is idle. To disable your screensaver:
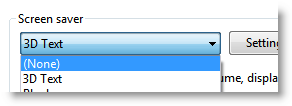
Right click the Desktop and click Personalize.

Click Screen Saver.

In the drop down list, select (None) and click OK.
5. Change Power Options
You what your computer does to save power when idle. To do so, click the battery icon in the system tray and click More power options.
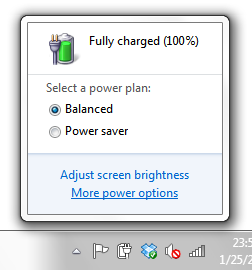
Select Power saver and click Change plan settings.

Lower the time it takes for your computer to dim the display, turn off the display, and sleep when on battery.
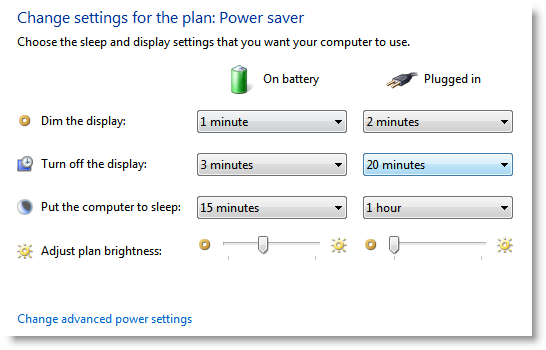
Click Change advanced power settings to fine tune your power-saving preferences

6. Adjust Visual Effects
Visual effects also use CPU and memory and this drains your battery. To lower the effects and save battery power:
Click the Start button, click Control Panel, and type visual in the top-right search box. ClickAdjust the appearance and performance of Windows.

Select Adjust for best performance and click OK.

7. Turn off Windows Aero
Windows Aero enables the glass effect you see on your Windows. This (surprise surprise) also uses CPU and memory and should be disabled to save battery. To disable Windows Aero:
Right click the desktop and click Personalization. Click Window Color.
![battery life 17 14 Ways to Extend Laptop and Tablet Battery Life [Updated]](http://mintywhite.com/wp-content/uploads/2010/04/battery-life-17.png?c3a98b "battery-life (17)")
Uncheck Enable transparency and click OK.
![battery life 18 14 Ways to Extend Laptop and Tablet Battery Life [Updated]](http://mintywhite.com/wp-content/uploads/2010/04/battery-life-18.png?c3a98b "battery-life (18)")
8. Disable the Search Index
The search index indexes your files for quick searching. This is a convenience but comes at a great cost to battery life when it’s running. To save power, consider disabling the search index. To disable the search index:
Click the Start button, click Control Panel, and type index in the top-right search box. ClickChange how Windows searches.
![battery life 19 14 Ways to Extend Laptop and Tablet Battery Life [Updated]](http://mintywhite.com/wp-content/uploads/2010/04/battery-life-19.png?c3a98b "battery-life (19)")
Click Modify.
![battery life 20 14 Ways to Extend Laptop and Tablet Battery Life [Updated]](http://mintywhite.com/wp-content/uploads/2010/04/battery-life-20.png?c3a98b "battery-life (20)")
Remove all locations by unchecking them and click OK.
![battery life 21 14 Ways to Extend Laptop and Tablet Battery Life [Updated]](http://mintywhite.com/wp-content/uploads/2010/04/battery-life-21.png?c3a98b "battery-life (21)")
9. Keep Your PC Cool
The hotter your PC gets, the harder your fans have to work to keep it cool. To minimize the power drawn by your fans, keep your PC cool. If using it on your lap or on a pillow, ensure there is proper ventilation. Never use your PC on a blanket or soft surface where airflow is restricted. This will also keep your hardware working longer as hardware is less likely to overheat and fail.
10. Only Use Your Screen When You Need it
This tip links back to tip number 5. When in the power options, click Choose what closing the lid does. I always set the lid closing to do nothing and the power button to put the laptop to sleep. This way, when I’m taking a break, I can put my laptop lid down (which turns off the display and saves power) without my laptop going to sleep. I’m also lucky because my laptop has a Display button that, when pressed, turns off my display. I found this button very useful when I sat in class and didn’t need to use my laptop but didn’t want to close and open the lid repeatedly.
11. Disable Automatic Program Updates
![disable java update scheduler 01 14 Ways to Extend Laptop and Tablet Battery Life [Updated]](http://mintywhite.com/wp-content/uploads/2010/04/disable-java-update-scheduler-01.png?c3a98b "disable-java-update-scheduler-01")
Many programs like iTunes, Java etc. come with their own auto updating software. These programs frequently communicate with update servers and, collectively, can take a toll on battery life. It’s important to keep software up to date; however, you should consider disabling update checkers for software installed on your PC. Good software lets you disable this behavior when you install it; some software may require a little bit of digging to disable automatic update checking.
Here’s how to stop Java checking for updates:
Click the Start button and click Control Panel. When the Control Panel loads, type java in the search box, and click Java:
![disable java update scheduler 02 14 Ways to Extend Laptop and Tablet Battery Life [Updated]](http://mintywhite.com/wp-content/uploads/2010/04/disable-java-update-scheduler-02.png?c3a98b "disable-java-update-scheduler-02")
On the Update tab, uncheck Check for Updates Automatically:
![disable java update scheduler 03 14 Ways to Extend Laptop and Tablet Battery Life [Updated]](http://mintywhite.com/wp-content/uploads/2010/04/disable-java-update-scheduler-03.png?c3a98b "disable-java-update-scheduler-03")
Click Never Check:
![disable java update scheduler 04 14 Ways to Extend Laptop and Tablet Battery Life [Updated]](http://mintywhite.com/wp-content/uploads/2010/04/disable-java-update-scheduler-04.png?c3a98b "disable-java-update-scheduler-04")
Note: I’ve noticed the scheduled task for Java update checking is often left behind.
To remove the task:
Click the Start button, type task, and click on Task Scheduler
When the task Scheduler loads, click Task Scheduler Library in the left pane
In the right pane, look for the Java Update task, right click it, and click Disable:
![disable java update scheduler 05 14 Ways to Extend Laptop and Tablet Battery Life [Updated]](http://mintywhite.com/wp-content/uploads/2010/04/disable-java-update-scheduler-05.png?c3a98b "disable-java-update-scheduler-05")
12. Remove Peripherals and Media
CDs spinning in drives, external hard disk drives, memory cards in slots, and even a plugged in USB thumb drives all drain power at varying levels. Remove all external drives, cards, and CDs to save battery power and the life of your machine.
13. Add more RAM
I just added 1GB of RAM to a netbook and I noticed the battery life is quite a lot better. This is because when you run out of memory, application data is written to the hard disk (virtual memory), which requires the movement of mechanical parts and not just electrons alone. By adding RAM to a computer that is always swapping/thrashing, you’ll save a noticeable about of battery life.
14. Use Hibernate not Sleep/Standby
If you want good battery life that spans multiple sessions, consider hibernating your PC instead of putting it to sleep/on stand by mode. Hibernation mode stores all volatile memory on disk and requires less power than leaving volatile memory in RAM for quick access when you turn your PC on. You can easily use a whole battery in two weeks or less of sleep mode, so you could be losing around 10% of battery life each day your laptop is sleeping instead of hibernating (if you’re not using hybrid sleep mode.) For more details on sleep vs hibernate, visit this guide.
To hibernate your PC, click the Start button, click the arrow next to Shut Down, and clickHibernate:
![sleep hibernate 14 Ways to Extend Laptop and Tablet Battery Life [Updated]](http://mintywhite.com/wp-content/uploads/2010/04/sleep-hibernate.png?c3a98b "sleep-hibernate")
If you do not see the option to hibernate, press the Windows Key + R (or click Start > Run), type the following, and press Enter:
powercfg -h on
![powercfg h on 14 Ways to Extend Laptop and Tablet Battery Life [Updated]](http://mintywhite.com/wp-content/uploads/2010/04/powercfg-h-on.png?c3a98b "powercfg-h-on")
If the option is still not available, a reboot is required to show the Hibernate option on the start menu.
Bonus Tip
To get a power efficiency report:
- Click Start, type CMD, right click cmd.exe and click Run as Administrator.
- On the command line, type powercfg -energy to view a power efficiency report.
Tag :
Tips and Tricks,
Window 7
Use a Windows Repair Disc or USB Drive to Fix Your Broken PC

- You’ve made a change to your PC and it now won’t boot into Windows
- You get a message such as NTLDR is missing but your hard drive has not failed
- You get a virus on your PC and need command line access to fix the issue
- Windows starts to boot and then your PC power cycles
In this guide:
- How to make a Windows 7 repair disc yourself
- How to make a Windows 7 repair USB drive
- How to boot from a disc/USB drive and use it to repair your PC
Note: A repair disc cannot be used to install Windows and provides no functionality beyond that of a Windows installation disc. If you already have an installation disc, you can use that for system recovery.
Burn a Windows Vista/7 Repair Disc
To burn your own Windows repair disc you’ll need to be using Windows 7 or Windows Vista SP1 or later release:
1. Click Start, type create and click Create a System Repair Disc (Windows 7) or Create a Recovery Disc (Windows Vista)

2. Insert a CD/DVD, choose the DVD drive in which the disc resides and click Create Disc

Once the disc is finished, I recommend booting from the disc to test it—before you really need it.
Make a Windows Vista/7 Repair USB drive
If you own a netbook, don’t have an optical (CD/DVD/Bluray) drive etc., you should create a bootable USB repair drive.
To make a bootable Windows repair USB drive you’ll need to:
- Download the Windows recovery disc
- Make your thumb drive bootable
- Copy the recovery files to your thumb drive
1. Download the Windows Recovery Disc
Note: These links come with no warranty. I’ve downloaded these torrents and scanned them and they are clean:
- Windows 7 32-bit Recovery Disc
- Windows 7 64-bit Recovery Disc
- Windows Vista 32-bit Recovery Disc
- Windows Vista 64-bit Recovery Disc
2. Make your Thumb Drive Bootable
To prepare your USB thumb drive, you will need to delete all the drive’s files, create a FAT32 active partition, and copy over the Windows installation files. To do this:
2.1. Press Windows Key+R to open the Run dialog
2.2. Type diskpart and press Enter (If you don’t have diskpart, get it here)
2.3. Type list disk and press Enter
2.4. Type select disk 3 where the “3″ is the corresponding number of your USB drive
2.5. Type clean and press Enter
2.6. Type create partition primary and press Enter
2.7. Type active and press Enter
2.8. Type format fs=fat32 quick and press Enter
2.9. Type assign and press Enter to assign the USB drive a letter in Computer
3. Copy the Recovery Files to Your Thumb Drive.
To copy the files to your thumb drive:
3.1. Open the file you downloaded in step 1 with a utility capable of browsing ISO images (7 zip works well)
- Download 7zip and install it
- Right click the ISO file and select 7-Zip > Open Archive
3.2. Extract the contents of the ISO to the USB drive you formatted in step 2
Boot from a Disc/USB Drive and Use it to Repair Your PC
So now you’ve either downloaded a burned the Windows Vista/7 recovery disc, created your own Windows 7 recovery disc, or made a bootable Windows Vista/7 recovery thumb drive.
To boot from your disc/USB:
1. Insert your bootable repair disc/USB drive
2. Reboot your PC
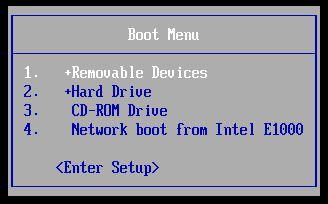
3. When your BIOS is loading (if you have a brand-name PC, this is usually when you can see the brand’s logo), press the key that loads the boot options menu (this is usually displayed as an option on the screen and is typically the ESC/F8 key)
5. Arrow down to “CD-ROM Drive” / “DVD-ROM Drive” / “Removable Media” / “USB Media” and press Enter
The recovery software will take some time to load:

6. Now select your default keyboard layout:

7. After the software detects your installation of Windows, click Next:

What Can You Do with a Repair Disc?
A repair disc cannot be used to reinstall Windows but can perform many repair tasks. Here is just a small list of what you can do with a repair disc:

- Startup Repair
- System Restore
- System Image Recovery
- Windows Memory Diagnostic
- Command Prompt
The most commonly used function (for me at least) is the Startup Repair. I use this when I get an error message like “NTLDR Missing”, “Unable to boot” etc. The startup repair checks the MBR, GPT etc for common errors and repairs them.
If you cannot boot into Windows because of corrupted settings, a virus etc, then you may find using a previously-created System Restore point will help you get back to Windows.
If you created a system image using Backup and Restore, you can use it to completely restore your computer to a previous state.
The memory diagnostic is used to check for bad memory sectors (more about the memory diagnostic tool.)
Finally, the command prompt can do (almost) anything the full command prompt can do while using Windows. This can be very useful to run tools like chkdsk to find out why your hard drive is suddenly not working.
For what functions have you used a system repair disc?
Tag :
Tips and Tricks